Offensive operators typically have their set of “go to” post-exploitation tools and methodologies. Among these, is Cobalt Strike – a very robust and defacto red teaming command and control (C2) platform that has many great built-in features. One of my favorite things about Cobalt Strike is the ability to customize different facets to meet your needs. Aggressor scripting has given operators a chance to add functionality that may be missing or changes they deem necessary (e.g., quality of life improvements, OPSEC modifications).
During a red team operation, lateral movement and persistence are very common actions performed by operators. Historically, Cobalt Strike’s built-in Windows lateral movement techniques were a little rigid; standard options included PsExec, PsExec – PowerShell, WinRM, and WMI. Cobalt Strike still has multiple areas where it depends on PowerShell and more about that can be found at Raphael Mudge’s blog Fighting the Toolset. However, with the recent 4.0 update we’ve seen some of the PowerShell dependencies removed. A lot of teams and tools have moved away from PowerShell by adapting languages like C# to perform the same activities.
In order to move away from reliance on PowerShell and still execute lateral movement or persistence, users need to perform actions in a manual manner. For example, an operator must create their payload, find a way to deliver it to the host (whether that be a file or a download cradle), and remotely execute the payload. Fortunately, this can be done in an almost seamless manner with a little Aggressor scripting. Drilling down a bit further, we can use .NET with Aggressor to perform our tasks in an almost fully automated manner. Additionally, the same idea can be applied to persistence actions.
Since Cobalt Strike version 3.11, operators have had access to a weaponized capability to execute arbitrary .NET assemblies in memory via Beacon. This capability helped accelerate offensive .NET tool development and subsequent public release of such tooling.
With this in mind, I wanted to offer more customization to the end user on what and how they perform both lateral movement and persistence. Many of these ideas and implementations are public and have been used for years. My goal with these projects was to simply bring together existing techniques and provide an automated way to perform them.
Today, I’m releasing two projects: MoveKit and StayKit. These projects are a combination of Aggressor scripts, .NET projects, and templates for payload creation. Both tools use a combination of existing Windows .NET assemblies, COM libraries, and PInvoke signatures to avoid any third party library requirements. The required assemblies of MoveKit and StayKit are SharpMove, SharpRDP, FileWriter, and SharpStay. These assemblies do not come already compiled with the project, it is up to the user to build them and place them in the appropriate directory.
It is important to keep in mind that although the Aggressor aspect of these tools plays a big part in the overall operator experience, all of the underlying capability is delivered via .NET assemblies. Therefore, Cobalt Strike is not a requirement to use any .NET projects mentioned. If you don’t use Cobalt Strike, any C2 agent that can execute a .NET assembly can take full advantage of the SharpMove or SharpStay assemblies.
MoveKit
Bringing these ideas together, brought the creation a toolset called MoveKit, which comes from the idea of other Cobalt Strike kits that allow further customizability within the toolset (e.g., Resource Kit, Artifact kit, and Elevate Kit). The aim of this is to extend the lateral movement capabilities of Cobalt Strike. Originally the project only leveraged WMI due the core of it starting from SharpWMI, but over time has had other techniques built into it and various changes giving an operator more options.
The kit contains a few different components to make everything possible. First, it contains a few .NET assemblies which include remote execution, and file movement. The first assembly, SharpMove has all of the .NET code to interact with remote systems for execution along with SharpRDP (two separate files because of RDP file size). The FileWrite assembly has all of the .NET code that handles writing data or files to remote systems.
Second, it contains different template source code files that are used for payload building and execution. Finally, the Aggressor script that handle all the menus, beacon commands, payload creation, file movement and so on. At first glance, the interface has a lot of options, but they all provide differences into how each action is performed.
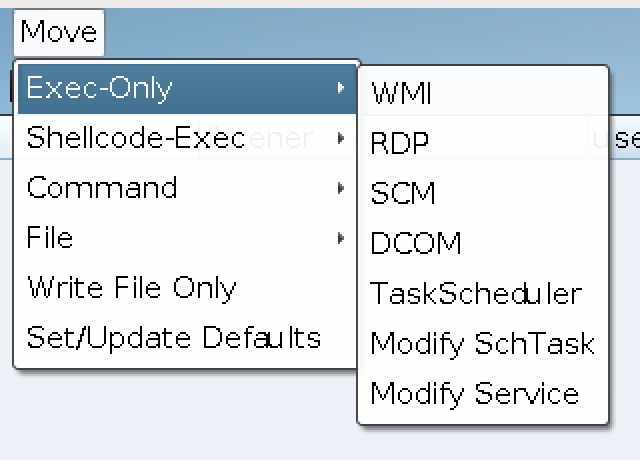
The Aggressor script is broken up into different sections that gives an operator control of what they want to do (Figure 1).
- The first section, is for execution only, meaning there is no file movement operation that takes place (Figure 1).
- The second area is for shellcode execution which does not require a file to be written to disk or a download cradle to be executed.
- Third, command execution (Figure 2) means a command is executed before a file is written or loaded into memory much like a download cradle.
- The last menu selection is for writing files or data only and no execution.
The current implemented techniques of remote execution in SharpMove/SharpRDP and MoveKit options are:
- Exec-Only
- WMI – Contains the ability for execution through Win32_Process WMI class. Additionally, has WMI WQL queries and VBS execution through WMI event subscriptions.
- SCM – Capability to create or delete services
- RDP – RDP to target through console application and execute specified command
- DCOM (Multiple) – Instantiate remote COM server and call method for command execution
- Task Scheduler – Create and delete a scheduled tasks
- Modify Service binpath (over WMI) – Uses Win32_Service WMI class to update the existing binpath of an existing service, starts service, pauses and resets the service back to original state
- Modify Scheduled Task Action – Modifies an existing scheduled task’s action with a command, runs the task, and resets back to original state
- Shellcode-Exec
- Excel 4 DCOM
- WMI Event Subscription (WIP)
- Command
- MSHTA
- RegSvr32
- WMIC
- File
- Custom (Prebuilt)
- MSBuild
- InstallUtil
- MSHTA
- RegSvr32
- WMIC
- Custom (Non-Prebuilt)
- Hijacks
- Service DLL Hijack
- DCOM Hijack
The fourth option (Figure 3), which is called ‘File’ in the menu, drops a file on disk and is executed with a command, such as MSBuild. This expands the execution mechanism more and gives the user more options as to how they would like to trigger their payload.
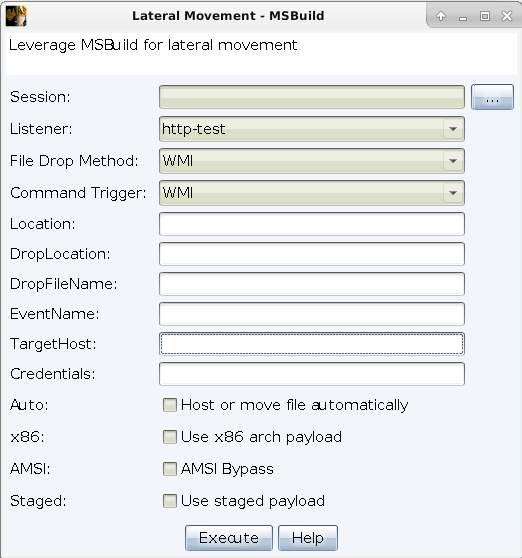
Since the ‘File’ options require writing files to the target the FileWrite assembly is used for these situations. In addition to moving data with WMI, both the Aggressor script and the FileWrite assembly can use SMB to move files but the Aggressor script will use the upload functionality in Cobalt Strike. The purpose of having both is to still give the operator the option to use the assembly outside of Cobalt Strike. The available options for FileWrite include:
- SMB – Aggressor script uses upload API call to remote UNC path but assembly has option for use outside of Cobalt Strike
- WMI to flat file – WMI event subscription with active script consumer that executes VBscript to write file to disk
- WMI to Registry key – WMI to write to registry data
- WMI to custom WMI class property – Creates a new custom WMI class and sets data to property value of custom property
The ‘File’ option only exposes the ‘SMB to flat file’ and ‘WMI to flat file’ options due to the amount of file writes that would be required. To write to a registry key or WMI class property, it would need to be done through the ‘Write File Only’ option. The main use case for these data writing primitives is places to store shellcode, ideally an operator would store shellcode in one of these locations and write a file that can read from it.
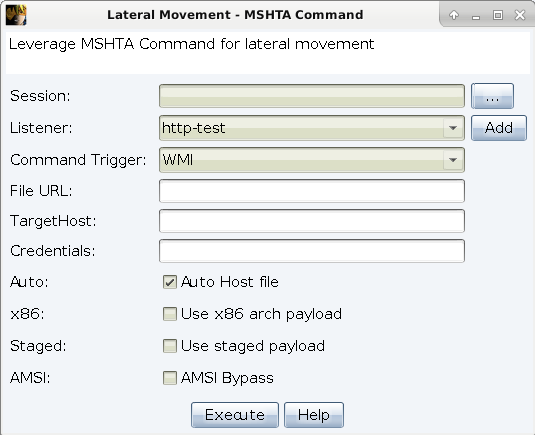
Initially looking at the available options of each technique (Figure 3) there are a lot of terms that mean different things. The following highlights what they mean and how they are handled to executing a specific task.
- Session – the beacon the lateral movement will originate from
- Listener – the listener which shellcode will be generated for. Only used if the Auto checkbox is checked (Optional)
- File Drop method – the method of getting the file to the remote system from either SMB or WMI (to flat file, Registry and WMI Class are not exposed here). Only used if the Auto checkbox is checked (Optional)
- Command Trigger – the way of triggering the command remotely
- Location – the location for where a payload is located. Only used when WMI is selected for ‘File Drop Method’ and Auto checkbox is checked (Optional)
- Drop Location – file path on remote target where the file will go. Only used if the Auto checkbox is checked (Optional)
- Drop File Name – the name of the file to be written on the remote host. Only used if the Auto checkbox is checked (Optional)
- Event Name – the name of the event, scheduled task, or service. Optional depending on command trigger type, used for WMI
- Target Host – computer attempting to move to
- Credentials – credentials to authenticate to remote system with
- Auto – auto build and move/host file (depending on mechanism). If not checked a payload will not be generated and moved
- x86 – architecture of shellcode to be generated (default is x64)
- AMSI – modifies HKCU\Software\Microsoft\Windows Script\Settings\AmsiEnable registry value, only applies to WSH not PowerShell
- Staged – use a staged payload (default is stageless)
It should also be noted methods that can stay persistent on a system after execution such as created services, scheduled tasks, and event subs are deleted automatically after execution is completed. However, files written to on a target are not removed and no option is available, it must be done manually, which is by design.
The option for Service Control Manager was also added to all techniques regardless if they are a service executable or not. When selecting ‘SCM’ as a command trigger option for a technique like MSBuild, what happens the service binpath is cmd.exe and MSBuild is spawned as a child process. The control manager dispatcher gives a certain amount of time to respond to it before killing the process, however, this does not affect the child process. Doing so raises an operational concern of spawning CMD and having child processes of it. A safety net has been built in for users that are not aware of this or forget this happens (Figure 4). This prompt will double check anytime SCM is selected and a service executable is not being used.

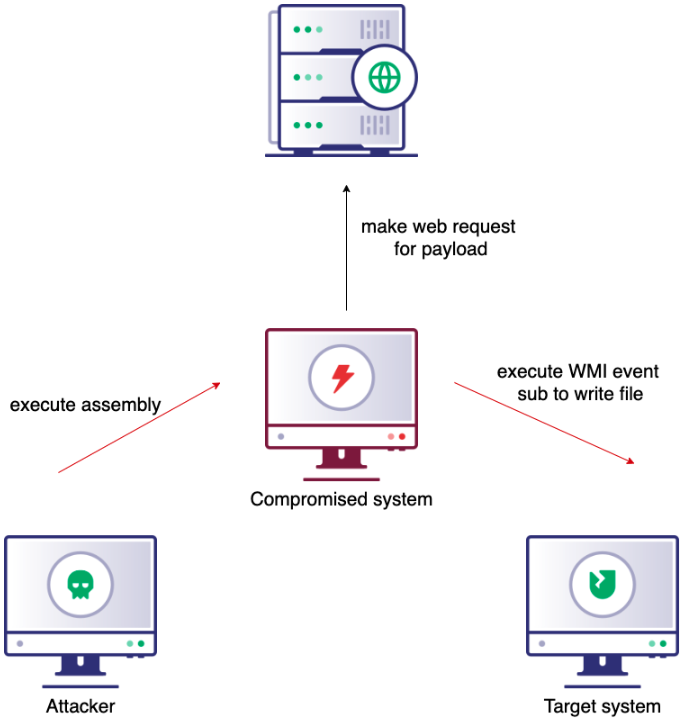
The WMI file movement option was briefly touched on before but has not fully been explained on what happens. The diagrams reference the term ‘WMI event sub’ as a generic term, but the techniques shown apply across all WMI options. The ‘Location’ option specifies where the payload is found and is only used if the file drop method is WMI. This can take three separate paths, each of which is explained below with diagrams. First, if a URL is entered, the beacon host executes an assembly that makes a web request to the ‘Location’ URI (Figure 5). The response from the request is saved as a variable that will be used in the WMI event sub to execute VBScript and write to the host.
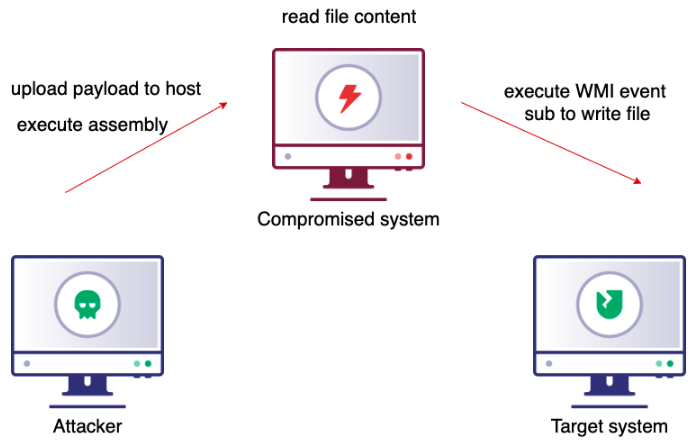
Second, the ‘Location’ field can take a Windows directory path, which if found will upload the file to the beacon host (Figure 6), execute the assembly that will read the file content and saves it as a variable inside the assembly and again leverage the WMI event sub to execute VBScript and write the file to disk. This in testing has not always been the most reliable due to the way Cobalt Strike handles taskings.
Finally, the ‘Location’ can take a Linux directory path which, if found, will read a file on the Cobalt Strike client system (locally), base64 encode it, write it to the C# source, and dynamically compile the assembly for execution on the beacon host (Figure 7). Of the three locations, this may be the cleanest because no file is uploaded and no HTTP request is made from the beacon host.
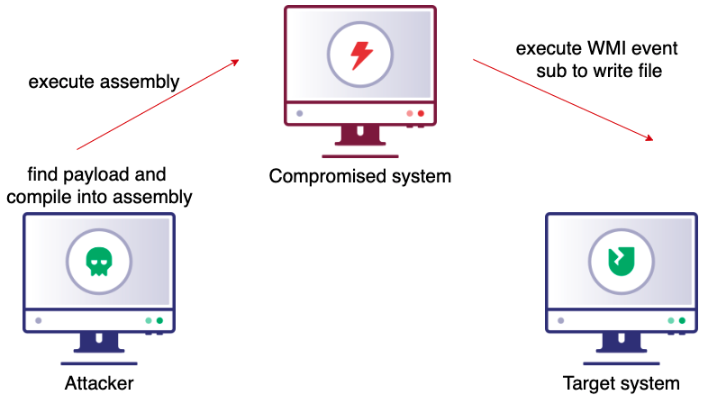
However, this method of dynamically compiling requires Mono to be installed on your Cobalt Strike client system because the Mono compiler is used to build the assembly. Currently, the dynamic compilation is only supported on Linux hosts, but Windows and macOS may be supported in the future. Each of these have their pros and cons, and this allows the operator to choose their preferred method.
Something to take into consideration when compiling a payload into the assembly for WMI file movement is file size. Currently, Cobalt Strike supports a maximum size of 1MB file size with execute-assembly. There may be times when an assembly is generated that will exceed that size limit and previously, Cobalt Strike would fail silently and not give any information about why the execution didn’t take place except on the team server. A check is built into the Aggressor script that will notify the user if the assembly size limit has been reached and will write the error (and potential fixes) out to the beacon session.

If the WMI file drop method is not selected, then the next available option will be SMB, which uses Cobalt Strike’s file upload functionality but as mentioned previously is also built into the assembly (for standalone usage). The WMI to Registry and Custom WMI Class are only exposed in the file movement only. The primary use case for either of those options is to have data (shellcode as an example) written to that location and a file that knows how to reach that data. This would most likely be used in conjunction with a custom pre-built file. Regardless, the options will remain there if an operator so chooses to use it.
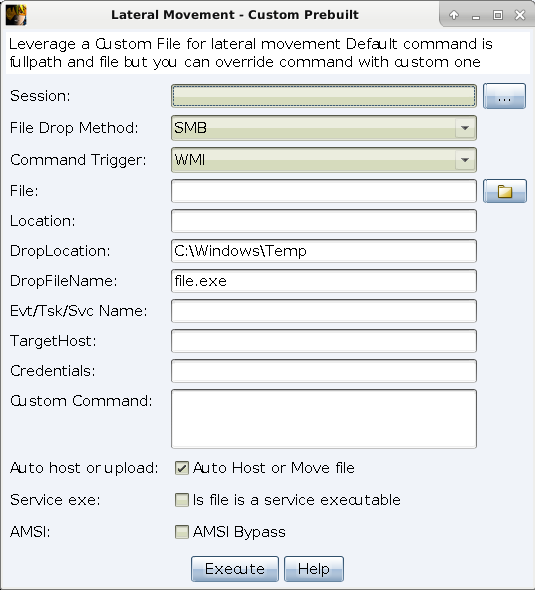
The payloads that are created from the kit all work from templates that come with it, but are all from other public projects. It is highly recommended that the templates be changed to suit your needs. In its current state the payload generation aspect of the tool is not very mature. There is no encrypting, obfuscating, or keying of shellcode/source code in the payload generation component. This may be addressed in the future but ideally would work better with an external payload generation toolset or CI pipeline. Additionally, there are two custom options available: Custom Pre-built and Custom non-prebuilt. The purpose of these options is to give the user a little more flexibility in the payloads used. If an operator has created a custom payload that needs to be deployed quickly the Custom Pre-built option can be used and all the same options can be applied to it such as dynamically compiling it into the assembly and moving it with a WMI event sub or by SMB. For the custom options the default will be to execute a binary with the command being its full path and file name. Since there are times when this is not always the case the custom option gives the user the option to override that and run a custom command (most likely used if specific arguments are required for execution).
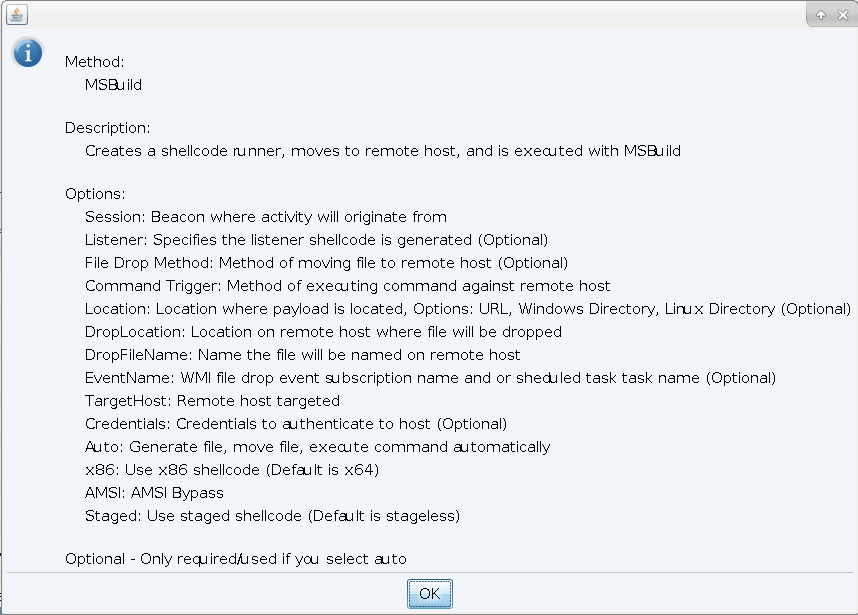
Understandably, there may be times when a user forgets what is optional and what is not, so there is a help dialog built that can give a little more detail of what all the options mean (Figure 9).
In addition to having dialogs for all the of implemented actions there are also commands built into beacon for all ‘File’ operations only. The commands use the defaults that can be modified by operators in the ‘Set Defaults’ dialog. The beacon command will read those defaults along with a few arguments given to execute lateral movement. The per task arguments include <move-type> <target> <listener> <drop filename> (Figure 10). For use with a custom pre-built binary the arguments are <move-type> <target> <local file location> <remote file name>. Once this information is given it will be executed like other beacon command.

There are a few items missing from the kit that will be implemented in the future which can make it more robust. The purpose of this is to be somewhat extendable due to if any new techniques are to be implemented into it and should only require a few additions. All of the current templates can be replaced (and should be, due to them mostly being place settings) for the operator’s needs and their own can be put in its place, however the filename must stay the same. There is a requirement to replace the templates aside from naming. The template must have a find and replace string (default is $$PAYLOAD$$ but can be changed) to find where to place shellcode in the appropriate format. Below is an example in C# of what this looks like.
| string strSC = “$$PAYLOAD$$”;byte[] sc = Convert.FromBase64String(strSC); |
StayKit
StayKit operates very similarly to MoveKit but can only install persistence on a host where C2 communications is already established, rather than via remote tasks. The kit is packaged with the SharpStay .NET assembly, an Aggressor script to handle user functionality and templates for persistence payloads. Persistence is something that is not built into CobaltStrike by design and most persistence scripts publically available have two reliances – Windows binaries and or PowerShell. It’s not to say those are bad, it is very dependent on the environment whether they can be used or not. StayKit offers operators alternatives to what already exists out there.
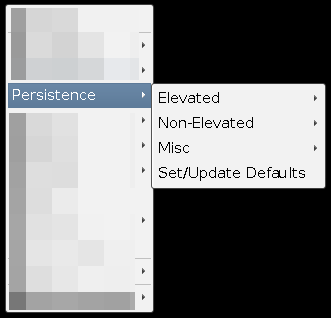
The persistence options of StayKit are broken up into three categories known as Elevated, Non-Elevated, and Misc. Much like MoveKit, StayKit also has the option for configuring defaults to make persistence installation quicker. The available persistence options are:
- Elevated
- Registry Keys (multiple)
- UserInit
- Scheduled Tasks
- Services
- WMI Event Subscription
- Non-Elevated
- Registry Keys (multiple)
- UserInitMprLogonScript
- Scheduled Task
- Scheduled Task COM Handler Hijack
- Junction Folder
- Misc
- Add Scheduled Task Action
- Replace Binary/File
- Startup Folder
- New LNK
- Backdoor LNK
- Get running services
- Get Scheduled Tasks
- Get Scheduled Task COMHandlers
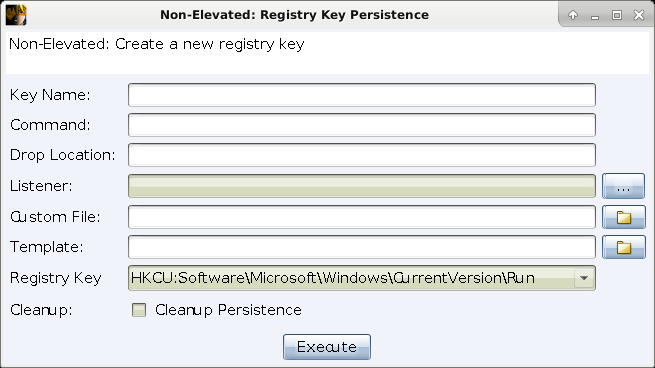
The techniques in StayKit are all commonly known persistence methods but more will be added in the future. Due to each of the persistence mechanism having very different options there are no beacon commands built in, only dialogs. Additionally, unlike MoveKit there are no templates that come with this, it is up to the operator to provide their own templates or pre-created files. When looking to install persistence there is a workflow to keep in mind. A file is only written to the host if ‘Custom File’ or ‘Template’ option is given. If ‘Template’ is selected that specified template is used and shellcode is generated for the selected listener and the file is dropped on disk. If ‘Custom File’ is used then that file is uploaded to the host. There is also a clean up option for each technique for when the persistence is no longer needed. There are a few options at a minimum that will need to be filled out in order to know what exactly needs to be cleaned up or removed.
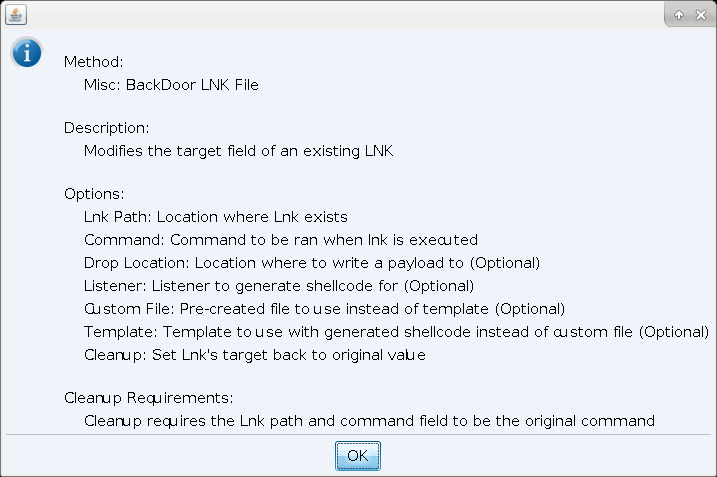
With all of the available options for each technique, it is easy to get mixed up what options are required when installing or removing persistence. Help menus have been added to each available option to assist in ensuring operators know what each option means (Figure 13).
Credits
Through templates, MoveKit provides the ability to modify and customize lateral movement options quickly, and efficiently. All of the templates included with MoveKit have been created from the research of several other researchers in the industry. There has been a lot of great analysis from researchers such as Casey Smith or Oddvar Moe (among others) that have found techniques of getting command execution by leveraging misplaced trust in binaries, scripts, and DLLs otherwise known as “Living off the Land”. Oddvar Moe has created a project called LOLBAS that documents some of these techniques that have been found by a number of people through the industry. These play into a part of the execution options of MoveKit.
Just like the templates, there are a lot of ideas, code and samples in the kit which I did not come up with or create. It is important to ensure the people that put hard work that went into these projects receive the credit they deserve. Credit for these ideas and code from:
MoveKit:
- WMI – code and idea from harmj0y’s SharpWMI project
- SCM – idea from Tim Malcomvetter’s CSExec project
- DCOM – code from rvrsh3ll’s SharpCOM project and cobbr’s SharpSploit project
- Excel 4 DCOM – code comes from rvrsh3ll’s Excel4-DCOM project and Outflank’s Excel4-DCOM project
- Modify Service binpath – idea from Mr-Un1k0d3r’s SCShell project
- Service DLL Hijack – code and idea comes from djhohnstein’s research and SharpSC project
- C# templates – code comes from subTee’s research
- Script templates – code comes from vysecurity’s CACTUSTORCH project
StayKit:
- WMI Event subscription – Empire project (actual WQL query) and Matt Graeber’s original research
- Scheduled Task COM Handler Hijack – idea from enigma0x3’s research
- Junction folder – code and idea comes from matterpreter’s OffensiveCSharp project
- Backdoor LNK – comes from harmj0y’s LNKBackdoor script
Closing
Overall I think this demonstrates some of the awesome things about Cobalt Strike by giving users the ability to make any changes they see necessary. As highlighted earlier, the Aggressor aspect of both kits offer a portion of operator assistance for generating payloads or moving files. However, the underlying capabilities are all decoupled and does not require Cobalt Strike. These projects are by no means a silver bullet to solve lateral movement or persistence in all environments but offers further customization options and another alternative. Both of these toolkits will be supported and have new capabilities built into them as time goes on and I receive more feedback. Additionally, there is a to do list of things that I would like to add which will come shortly as well. Ideas that are presented that are doable will be taken into consideration for adding to the kits.
Detections of lateral movement, persistence and the used payloads are pretty well documented. With the expanded popularity of C# and .NET malware, the screws are tightening on offensive C# usage with the inevitable availability of increased detection capability. With versions of .NET 4.8 we’ve seen the integration of the Anti-Malware Scan Interface (AMSI) when using assemblies and Event Tracing for Windows in the Common Language Runtime. Applying these capabilities with strong methodologies paves the way for future detections of .NET offensive tooling. Ideas on detection capability of discussed options in both kits will be a post to come at a later time.
As seen from the numerous cited works, these projects rely upon a lot of hard effort dedicated by others in the industry. Outside of a few ideas and methods, I mainly pulled together different techniques and ideas of other tools into one kit for quick, customized use.
It is important when dealing with lateral movement and persistence that operators take into account all of the repercussions of actions before performing them on hosts. There are many opportunities to extend the capabilities of each project to suit operator needs. It’s always great to see what people come up with!
Disclaimer: these are not officially licensed/endorsed kits by Cobalt Strike nor its creator Raphael Mudge.

awsome! Thank you so much for the amazing article however something is vague to me! Still do not understand the difference between the custom file and template file! Let’s say I want to do a persistence startup! If I have an evil.ps1, for example, should I select a custom file or template file?
LikeLike
The templates are in the template directory vs custom is an already built file. An example is if you have .net source code for a shellcode runner in the template directory it will grab shellcode from cobalt strike and build it, but a custom file would be an already compiled file you’ve already built.
LikeLike